
Usually to be connected to a Wi-Fi network it is sufficient to put the Wi-Fi on, click on the Wi-Fi icon (on the taskbar at right), select the right name from the available Wi-Fi list and (if protected) insert the proper secure key.
However sometimes, there are Wi-Fi network (e.g. in a firm, in an university) that requires specific security parameters settings to enable the connection of a client. Therefore, in the following I display how to manually configure a Wi-Fi network connection, whenever it is needed. The procedure is very similar for Windows 10 and Windows 8.1: however I will show the step-by-step procedure for both, just in case 🙂
… and what if do you still have Windows 7 on your PC?? In that case … please upgrade to Windows 10 then, it is free till 29/7/2016 (in this previous post you can find some info how to)!!
Anyway in Windows 7 too the procedure is very closed to the one I am going to describe in the following … 😉
P.S. If your company have a issued a CA Certificate, it could be sufficient to install it to make the Internal WiFi work. To install the firmNameCa.cer you should probably run the Command Prompt as an Admin and then, going in the folder were you have the certificate and run a command file (e.g. import_ca.cmd) to add it on the PC Trusted Root Certification Authorities.
certutil -addstore Root firmNameCa.cer
====================================
Step-to-step procedure for Windows 10
If you have already tried to connect to a Wi-Fi network without success, first of all it is convenient to let the PC forget the existing configuration for that network.

Cannot connect to a Wi-Fi network that requires special protection settings (1)

Cannot connect to a Wi-Fi network that requires special protection settings (2)
To let the PC forget this Wi-Fi network, go the Settings -> Network & Internet, select the Manage WiFi settings link (at the end of the list at the available Wi-Fi network): alternatively, you can go to the Network & Internet setting page also clicking on the Wi-Fi icon [toolbar on the right] and clicking on the Network settings link.

Network settings

Manage WiFI settings
In that MANAGE WI-FI SETTINGS page, select the Wi-Fi network to forget and click on the Forget button.

Let the PC forget the Wi-Fi network if already not properly configured
PS (1/8/2016) – In the last release of the operating system, the previous screenshots related to Network settings changed a bit as follows, even though the procedure did not change: Settings -> Network & Internet -> WiFi -> Manage known networks


Then, let you manually configure that network, choosing the proper parameters settings. Obviously, those settings should be provided by that network provider: in the following I will show you only an example on how to set the available parameters.
Go [right click on Start] to Control Panel -> Network & Internet -> Network and Sharing Center and click on the Set up a new connection or network link. Alternatively, may be better, right click on the Wi-Fi icon [on the taskbar, at right] and choose Open Network and Sharing Center.

Set up a new connection or network (1)
Select the Manually connect to a wireless network section.

Set up a new connection or network (2)
Insert the Network name (be careful that it must be exactly the name of the network, as it is defined by that network provider, e.g. INTEXXXXX), the proper Security type (e.g. WPA2-Enterprise).
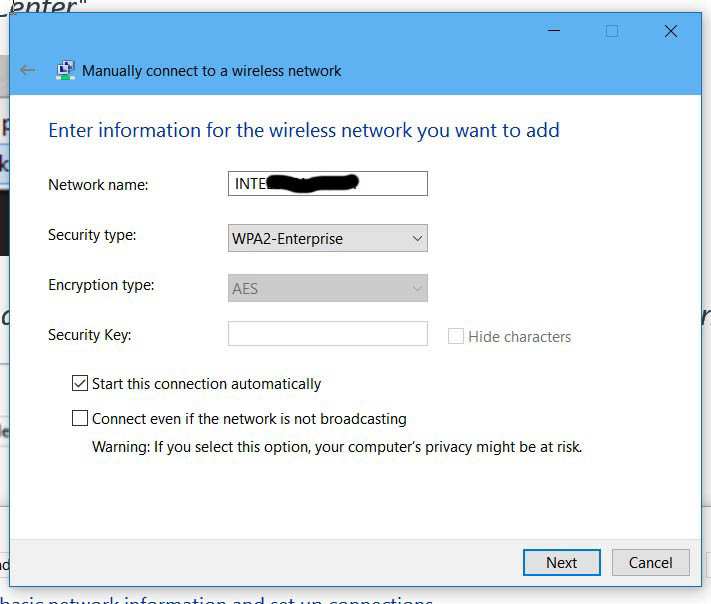
Manually connect to a wireless network (1)
After that step, click on Change connection settings to better define the parameters associated to that connection.

Manually connect to a wireless network (2)
Go to the Security tab and click on the Setting button.

Manually connect to a wireless network (3)

Manually connect to a wireless network (4)
Be careful to possibly uncheck the Verify the server’s identity by validating the certificate option (e.g. the connection to the firm INTEXXXXX Wi-Fi network does not work if this parameter remains checked, as it is by default).

Manually connect to a wireless network – uncheck Verify the server’s identity by validating the certificate (5)
After confirmed the changes done in that Settings section, click to the Advanced setting button, always available in the Security tab. Here specify the needed authentication mode (e.g. Specify authentication mode -> User authentication) and, if you like, click on Save credentials and store your current credentials reminding to specify the domain in the username (e. g. companyname\usercode): in this case, remind that every time the password changed (may be periodically as defined by your firm security policy), you have to delete the previous WiFi configuration (e.g. the INTEXXXXX one) and configure it again, providing the new password in the credential settings.
Otherwise, if you do not set your credential in that configuration form, you’ll have to insert your credential each time you want to use that configured Wi-Fi (as shown in the screenshot “Sign in into the new configured Wi-Fi network with your credentials“) : personally, I prefer the first option 🙂

Manually connect to a wireless network (6)
Click on all the OK button to confirm all the changes you did.
After all those settings [that must be done only ones 🙂 ], you can go to the list of available Wi-Fi networks [e.g. click on the Wi-Fi icon on the taskbar, right side], click the Connect button and insert your credentials (if you saved your credentials in the configuration, you do not need to insert them any more). Be careful to insert also the domain before your username in the credential input field (e.g. yourcompany\usercode).

Sign in into the new configured Wi-Fi network with your credentials

Connected, secure
See also this link for more information.
If you want to arrange the list of Wi-Fi connections to order a priority (in previous windows version, you could simply do a drag&drop of the names of the various Wi-Fi connections) you can have a look at the following link: How to change priority of wireless networks in Windows 10?
========================================
Step-to-step procedure for Windows 8.1
If you have already tried to connect to a Wi-Fi network without success, first of all it is convenient to let the PC forget the existing configuration for that network: right click on the Wi-Fi network name in the list of available networks [available clicking on the Wi-Fi icon on the taskbar, right side] and choose Forget this network.

Forget this network
In Control Panel -> Network and Internet -> Network and sharing center, click on Configure new connection or network.
From now on, the procedure is the same previously described for Windows 10: anyway in the following there are some related screenshots for a Windows configured with the Italian language, whenever it could be useful for someone 😉

Configure new connection or network

Manually connect to a wireless network (1)

Manually connect to a wireless network (2)


Manually connect to a wireless network (4)

Manually connect to a wireless network (5)

Manually connect to a wireless network (6)
============================================================
In a following post you can find some further information (in Italian and password protected) specific to my firm Wi-Fi.
======================
Questo post si aggiunge ad altri che sono specificatamente indirizzati a colleghi di TILAB e talvolta anche a tutta TIM in generale. 🙂
PS: puoi trovare gli altri post filtrando, nella combobox a destra, sulla categoria “Aziendali”. Alcuni sono protetti da password per cui se ti interessano puoi contattarmi tramite l’email aziendale o telefonicamente.


